How to Easily Turn Off and On Auto-Suspend in Ubuntu 22.04
Enable/Disable Auto-Suspend in Ubuntu 22.04: A Simple and Fun Guide! 🌟
Hello, friends! Today, we’re diving into a handy feature on your Ubuntu computer called auto-suspend. This feature makes your computer take a nap when you’re not using it. While it’s great for saving battery life, it can sometimes be a bit annoying. So, let’s explore how to control this feature and make your computing experience smoother!
What is Auto-Suspend? 🤔
Auto-suspend is like a little sleep button for your computer. When you don’t touch it for a while, it goes to sleep to save energy. It’s fantastic for saving battery on laptops, but if you’re watching a movie or working on something important, it can be a bother!
Fun Fact! 🎉
Did you know that auto-suspend can help extend the lifespan of your laptop battery? By reducing power consumption when not in use, you can keep your device running longer!
Why Would You Want to Turn It Off? 🚫
Here are some reasons you might want to turn off auto-suspend:
- Working on Projects: If you’re busy with homework or a fun project, you don’t want your computer to fall asleep!
- Watching Videos: If you’re watching your favorite show, you don’t want it to stop just because you took a snack break.
- Remote Access: If you’re using your computer from another place, you want it to stay awake.
How to Turn Off Auto-Suspend in Ubuntu 22.04
Let’s learn how to turn off auto-suspend! You can do it in three fun ways:
Method 1: Using the Settings App 🛠️
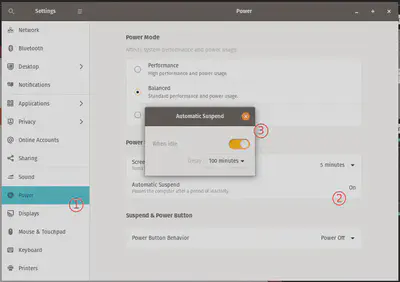
- Open Settings: Click on the little gear icon at the top right of your screen.
- Go to Power Settings: Find the “Power” option on the left side.
- Turn Off Auto-Suspend: Look for “Automatic Suspend” and switch it to Off for both “On Battery” and “Plugged In”.

Method 2: Using the Terminal (Command Line) 💻
If you like typing commands, this is for you!
Open Terminal: Press
Ctrl + Alt + Tto open a black window where you can type.Type This Command: Copy and paste this:
gsettings set org.gnome.settings-daemon.plugins.power sleep-inactive-ac-timeout 0
gsettings set org.gnome.settings-daemon.plugins.power sleep-inactive-battery-timeout 0
Check Your Work: You can see if it worked by typing:
gsettings get org.gnome.settings-daemon.plugins.power sleep-inactive-ac-timeout
gsettings get org.gnome.settings-daemon.plugins.power sleep-inactive-battery-timeout
Method 3: Using the Dconf Editor 🎨
This is a cool tool that lets you change lots of settings!
Install Dconf Editor: Type this in the terminal to get it:
sudo apt install dconf-editorOpen Dconf Editor: Find it in your applications.
Navigate to Power Settings: Go to
org>gnome>settings-daemon>plugins>power.Turn Off Auto-Suspend: Change the
sleep-inactive-ac-timeoutandsleep-inactive-battery-timeoutto 0.
How to Turn On Auto-Suspend Again 🌙
If you want your computer to take naps again, here’s how to turn auto-suspend back on!
Method 1: Using the Settings App 🛠️
- Open Settings: Click on the gear icon again.
- Go to Power Settings: Click on “Power.”
- Turn On Auto-Suspend: Switch “Automatic Suspend” to On for both “On Battery” and “Plugged In.”
Method 2: Using the Terminal (Command Line) 💻
Open Terminal: Press
Ctrl + Alt + T.Type This Command: Replace
TIMEOUTwith how many minutes you want (like300for 5 minutes):gsettings set org.gnome.settings-daemon.plugins.power sleep-inactive-ac-timeout TIMEOUT gsettings set org.gnome.settings-daemon.plugins.power sleep-inactive-battery-timeout TIMEOUTCheck Your Work: Use the same check command as before!
Method 3: Using the Dconf Editor 🎨
- Open Dconf Editor: Find it in your applications.
- Navigate to Power Settings: Go to
org>gnome>settings-daemon>plugins>power. - Turn On Auto-Suspend: Set the
sleep-inactive-ac-timeoutandsleep-inactive-battery-timeoutto your desired time in seconds.
What If It Doesn’t Work? 🤷♂️
If your computer still doesn’t listen, try these tips:
- Settings Not Saving: Make sure you have permission to change settings. You might need to use
sudoin the terminal. - Auto-Suspend Still Active: Check if any other programs are trying to control power settings.
- Ensure there are no background processes preventing suspension; check System Settings -> Power -> Automatic Suspend settings.
Troubleshooting Tips! 🔧
If you encounter issues, consider restarting your computer after making changes. Sometimes, a simple reboot can resolve lingering settings that don’t take effect immediately.
Conclusion 🎉
Now you know how to turn off and on auto-suspend in Ubuntu 22.04! Whether you’re working, watching videos, or just having fun, you can control when your computer sleeps.