How to Install XAMPP on Ubuntu: A Step-by-Step Guide
How to Install XAMPP on Ubuntu: A Step-by-Step Guide
Are you looking to set up a powerful PHP development environment on your Ubuntu system? Look no further! XAMPP is one of the most popular cross-platform PHP development environments available today. This open-source package is easy to install and use, making it a favorite among developers worldwide.
What is XAMPP?
XAMPP stands for:
- X: Cross-platform
- A: Apache
- M: MariaDB
- P: PHP
- P: Perl
With over a decade of community support, XAMPP has become a go-to solution for developers working on various platforms, including Windows, Linux, and Mac.
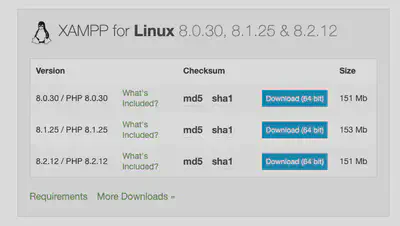
To get started, download the latest version of XAMPP for Linux from the official download page. As of this writing, the latest release is version 8.0.6.
Step-by-Step Installation of XAMPP on Ubuntu
1. Download the XAMPP Installer
- Visit the XAMPP Home page.
- Select XAMPP for Linux to access the direct download link for the latest version.

2. Change Permissions for the Installer
Once the download is complete:
Open your terminal (
Ctrl + Alt + T).Navigate to the directory where the installer is saved.
Run the following command to change the permissions:
sudo chmod 755 xampp-linux-*-installer.runNote: Replace
xampp-linux-*-installer.runwith the actual file name.
3. Run the XAMPP Installer
To start the installation process, execute the following command:
sudo ./xampp-linux-*-installer.run
This will launch the installer wizard. Follow the prompts to complete the installation. By default, XAMPP will be installed in the /opt/lampp/ directory, but you can customize this location if needed.
4. Install Supporting Packages
To ensure smooth operation, install the net-tools package, which includes the netstat command:
sudo apt install net-tools -fy
5. Manage Your XAMPP Server
You can start, stop, and restart your XAMPP server using the command line or the graphical user interface (GUI).
Command Line Interface (CLI)
Start the server:
sudo /opt/lampp/lampp startStop the server:
sudo /opt/lampp/lampp stopRestart the server:
sudo /opt/lampp/lampp restart
Graphical User Interface (GUI)
To launch the graphical manager, use the following command:
sudo /opt/lampp/manager-linux-x64.run
6. Create Bash Aliases for Convenience
To simplify command usage, create an alias for the graphical manager. Add the following line to your ~/.bashrc file:
echo "alias lamppStart='cd /opt/lampp/ && sudo ./manager-linux-x64.run'" >> ~/.bashrc
After adding the alias, reopen your terminal to use it.
7. Create a Launcher Icon
You can create a launcher icon for easy access to XAMPP. Use the following code:
cat > ~/.local/share/applications/xampp.desktop <<EOL
[Desktop Entry]
Version=1.2
Encoding=UTF-8
Name=XAMPP
Exec=sh -c "pkexec env DISPLAY=$DISPLAY XAUTHORITY=$XAUTHORITY sudo /opt/lampp/manager-linux-x64.run"
Icon=/opt/lampp/htdocs/favicon.ico
Terminal=false
Type=Application
Categories=Network;WebBrowser;Development;
MimeType=text/html
EOL
Conclusion
Congratulations! You have successfully installed XAMPP on your Ubuntu system. With this powerful development environment, you can now create and manage your PHP applications with ease.
Happy coding! 😄